This is the 1st part of a multi-part series. View the rest:
- Part 1: Plans and Materials
- Part 2: The Piano Bench
- Part 3: The Piano
This is the first in a series of posts recording my experience building what I’m calling a “toddler piano”. Why would one build something like this, you might ask. Well, I enjoy playing the piano, and my 3-year-old daughter enjoys it. In an effort to encourage her to tinker around, I’ve been looking for a realistic piano or keyboard that she can use.
But, all the small “pianos” I’ve found are really small and sound like xylophones or glockenspiels. Not what I have in mind.
So…my plan is to build a case around a small keyboard which looks like a real piano, just smaller.
As always, let me preface this writeup: I am not a professional woodworker. I simply enjoy building things as a hobby, and I try to build things I know I’ll use and love.
I’ll do my best to provide as much detail as I can throughout the process, and I’ll try to take a lot of photos.
The Plans
I’ve already purchased this wonderful keyboard from Yamaha: the Yamaha Piaggero np11. I specifically chose this keyboard because it has 61 keys and a very simple look, which should blend in well with the case I’m making.
Once the keyboard arrived I took some measurements to draw up some rough plans.
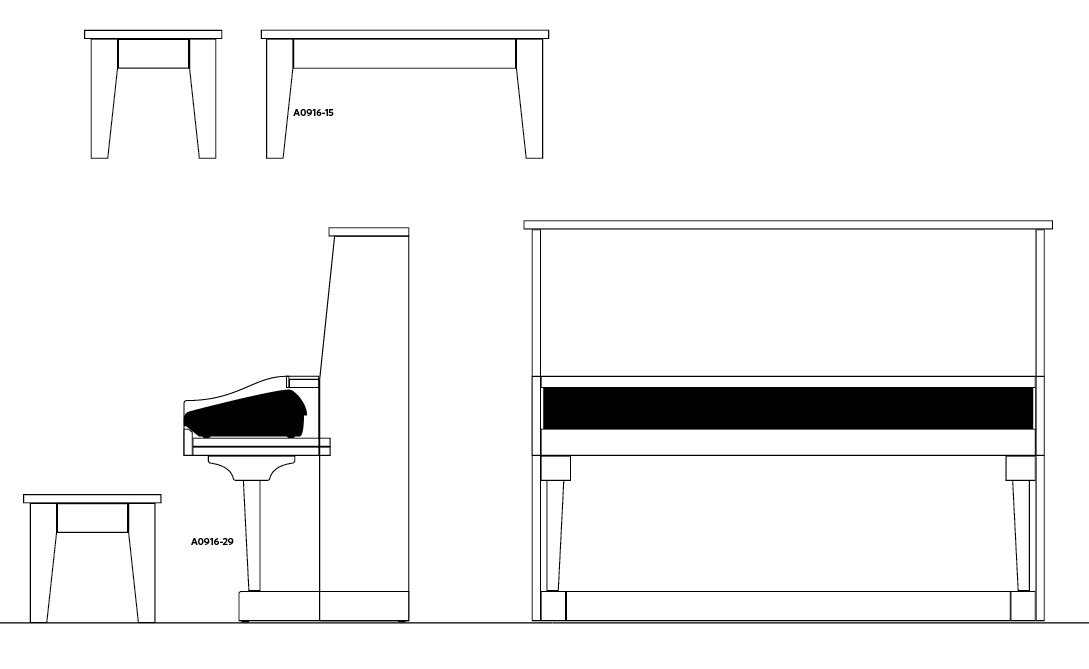
This is essentially what the finished bench and case will look like, though I’m not entirely clear on all the details yet!
The part numbers next to the legs refer to some pre-cut wooden legs I’ll be purchasing from my friends at Adams Wood Products. Their products have been incredibly useful for me, and these simple legs will be no exception. They’ll save me some time and probably be much more accurate than if I were to try and craft these legs myself.
The Materials
Based on the rough plans above, I tried to sketch out a materials list, which I’ll reproduce here. I’ve broken it up into sections for my own sanity, and tried to stick to wood pieces commonly available at a typical hardware store or lumber mart.
Piano Bench
- 3 – 1″×3″×2′ Pine board (bench sides)
- 2 – 1″×12″×2′ Pine board (bench top and bottom)
Piano Frame
- 1 – 3″×3″×3′ Pine turning block (piano feet)
- 5 – 2″×3″×8′ Pine studs (framing)
This section is sort of guesswork, but I’ll be trying to create a semi-rigid frame inside the case so the thing doesn’t fall apart.
Piano Faces
- 1 – 3″×3″×3′ Pine turning block (2 decorative leg toppers)
- 1 – 1″×8″×2′ Pine board (2 keyboard side rails)
- 3 – 1″×3″×4′ Pine board (music stand bottom, keyboard tray front, kickplate)
- 2 – 1″×16″×4′ Pine board or pine edge-glued panel (piano front top: music stand, piano front bottom)
- 3 – 1″×8″×4′ Pine board (piano top and sides)
- 1 – 1″×8″×4′ Pine board or pine edge-glued panel (keyboard tray)
- 1 – 1″×4″×2′ Pine board (keyboard leg supports)
Hardware
-
- 1 – 30″ Continuous hinge (piano hinge) in brass
Up Next
I’ll do my best to explain what all these different pieces are as I go, and you can peek ahead to see exactly what all this amounts to.
The first thing I’m going to tackle is the piano bench, since that is the simplest and shouldn’t take very long.